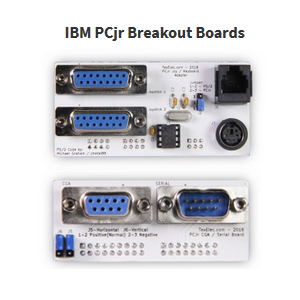
You may have already noticed that we added two new products to our store last night. We are so excited to break into the IBM PCjr world with our breakout boards! We recently found an IBM PCjr and loved playing with it so we just couldn’t help ourselves. We were mostly inspired when we started looking for a keyboard and monitor for the PCjr as ours did not come with either of these. Both of these items are a bit hard to come by and we needed both! The keyboard we did find was not tested and had issues when we it arrived. Not to mention the reliability of the wireless/infrared design to begin with, we all know how reliable that was back in the day!
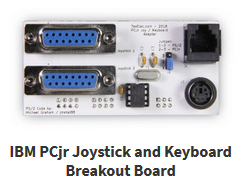
First we have the IBM PCjr Joystick and Keyboard Breakout Board which allows you to connect either a PS/2 keyboard or an IBM PCjr keyboard via a standard RJ-12 phone cable. It also has two joystick ports to allow you to use standard PC analog joysticks. There is much more detail on the product description about how it all works so be sure to check it out.
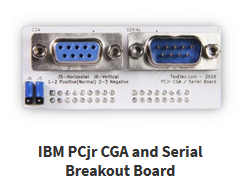
Second we have the IBM PCjr CGA and Serial Breakout Board. This card will allow you to connect a standard CGA monitor and a standard serial device. Again, there is more detail in the product description so check it out if you’re interested.
Don’t miss our YouTube video all about both of these PCjr cards along with a teaser about a future board at the end! 😉
We are also happy to now be offering shipping to South America! Honestly, we have had some bad experiences shipping to some parts of South America but had totally dismissed Brazil!
We have shipped there via eBay on numerous occasions and should have been offering this all along. We finally had someone bring this to our attention and so here we are, shipping to South America via our store. If you are in South America please feel free to order here via our website. If you have an issue, just let us know so we can work it out. We now have a new customer with a video using our Resound card because he contacted us. So if you speak Portuguese you may find this video very helpful:
Speaking of the Resound, we will be restocking more of those very soon! Hopefully you saw our last video asking for some feedback about the playback on some games. We heard about some games having an issue with the gain so we were entertaining the notion of installing a gain knob. After posting a video for feedback and installing a gain knob we don’t really see too much benefit in that. It simply just didn’t make that much difference according to our followers and our tests. So our plan is to reduce the gain to avoid it peaking. This way you may just need to raise the volume on some games, and that’s it. No pesky gain knob on the back of the machine to deal with. We should have those back in stock within the next few weeks.
We have also had some requests for other Lo-tech boards we don’t currently offer. We were finally able to reach James and hopefully we will have the following boards in stock very soon, we are just waiting on some files; Tandy 1400 XT-CF PCB, 8-bit IDE Adapter PCB and the XT-CF-lite rev.2 PCB.
There may be an Adlib OPL2 clone in our very near future. Kevin could be in there ordering parts right now and I probably shouldn’t be saying this. 😉
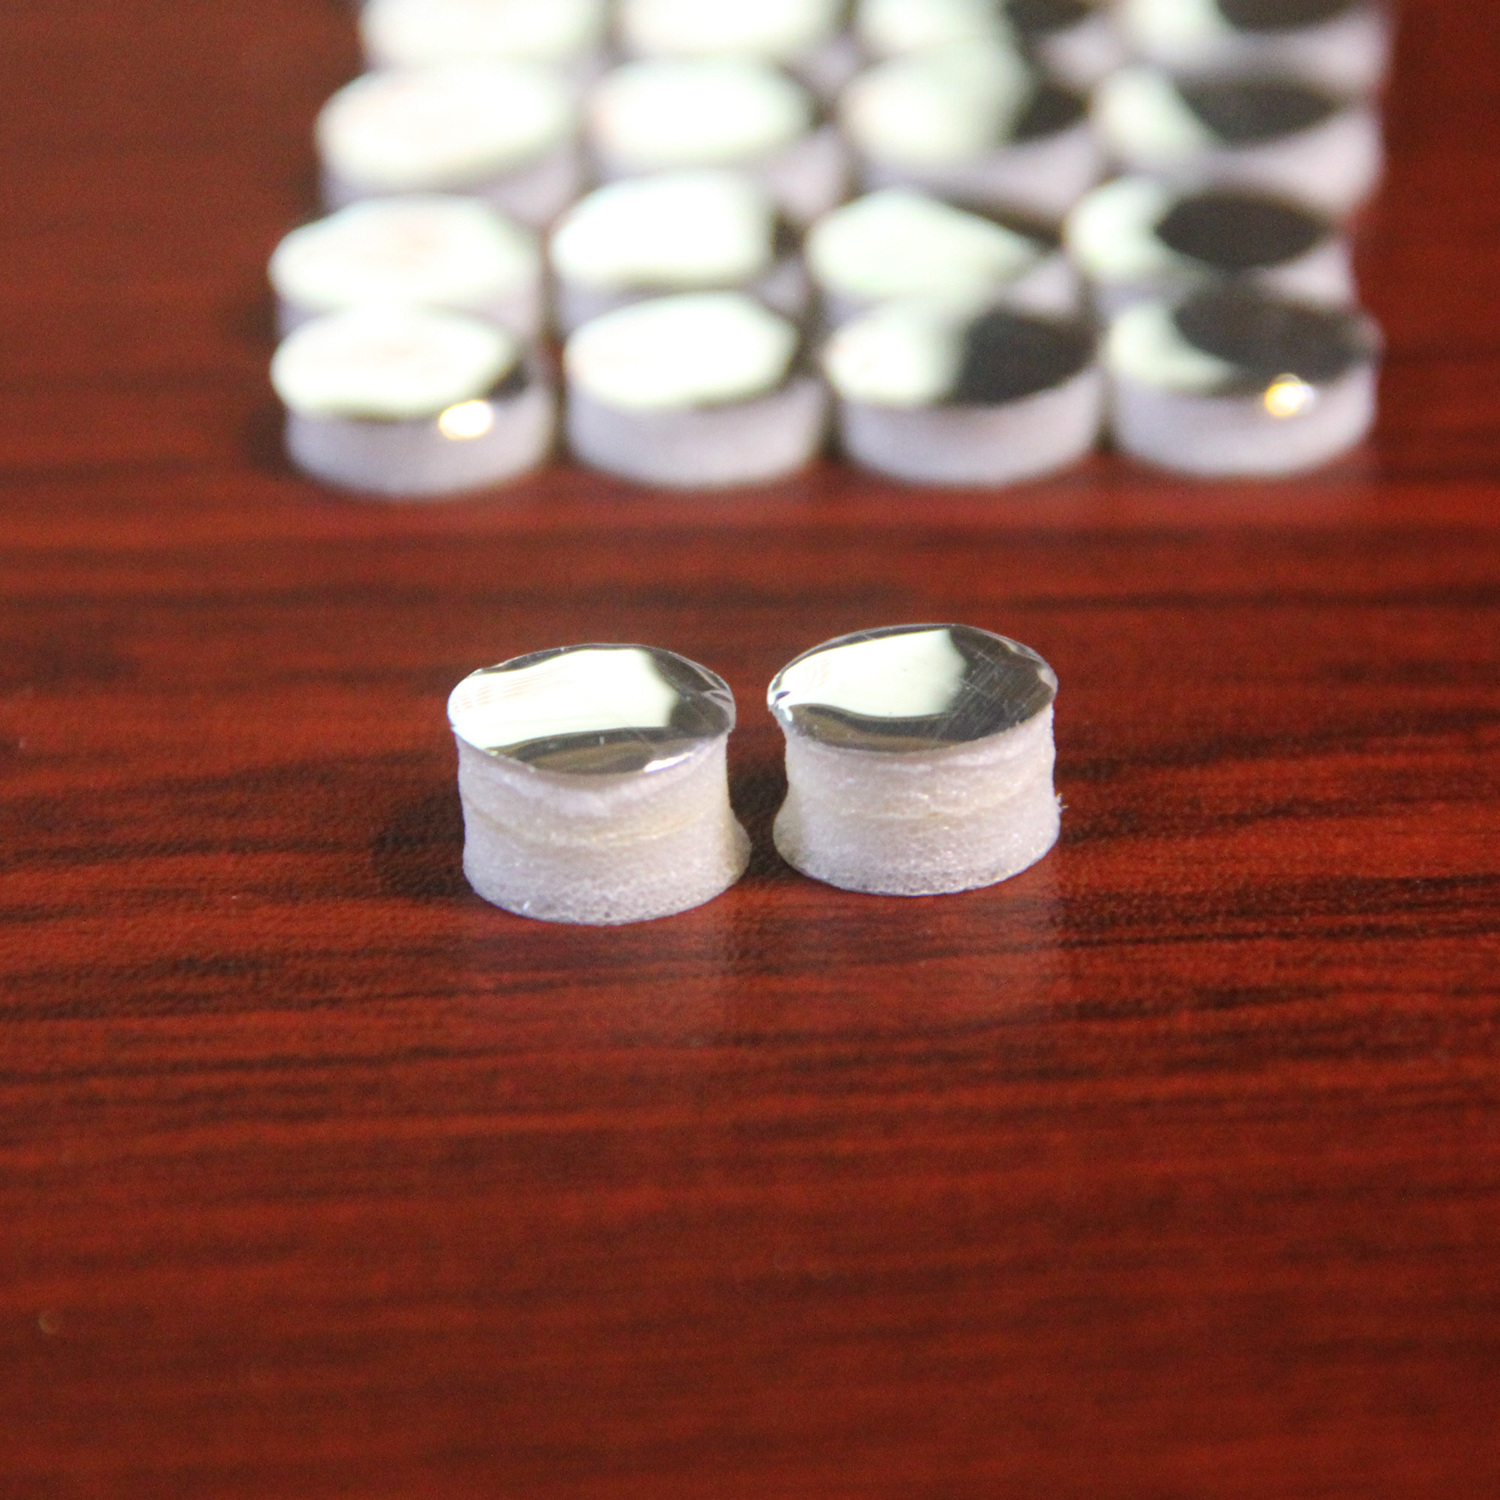
*** Update 9/12/2018: We ultimately found that making the pads thicker helped our problem and we switched to open cell foam as it feels more like the OEM foam provided by KeyTronic. Here is a link to the latest post about this. ***
** Update 7/26/2018: After some issues with some SOL machines I am now currently working on finding and using a new foam that will be more like the original KeyTronics OEM foam capacitive pads. My hope is that it will ensure continuity across all machines and the key presses will feel like they did back in the day. I am dedicated to finding the best solution and providing it for you! No more cleaning, cutting, hammering fiddling, hurting, tedium and torture. 😄 I want to give a big THANK YOU SO MUCH to the ever patient vintage computer community! I couldn’t do it without all of your testing and input!!! If you want to see the saga for yourself I have provided links later in the post to a couple of different forums where you can see it all being hashed out play by play. Fair warning, I can be quite long winded at times, so please brace yourself. ***
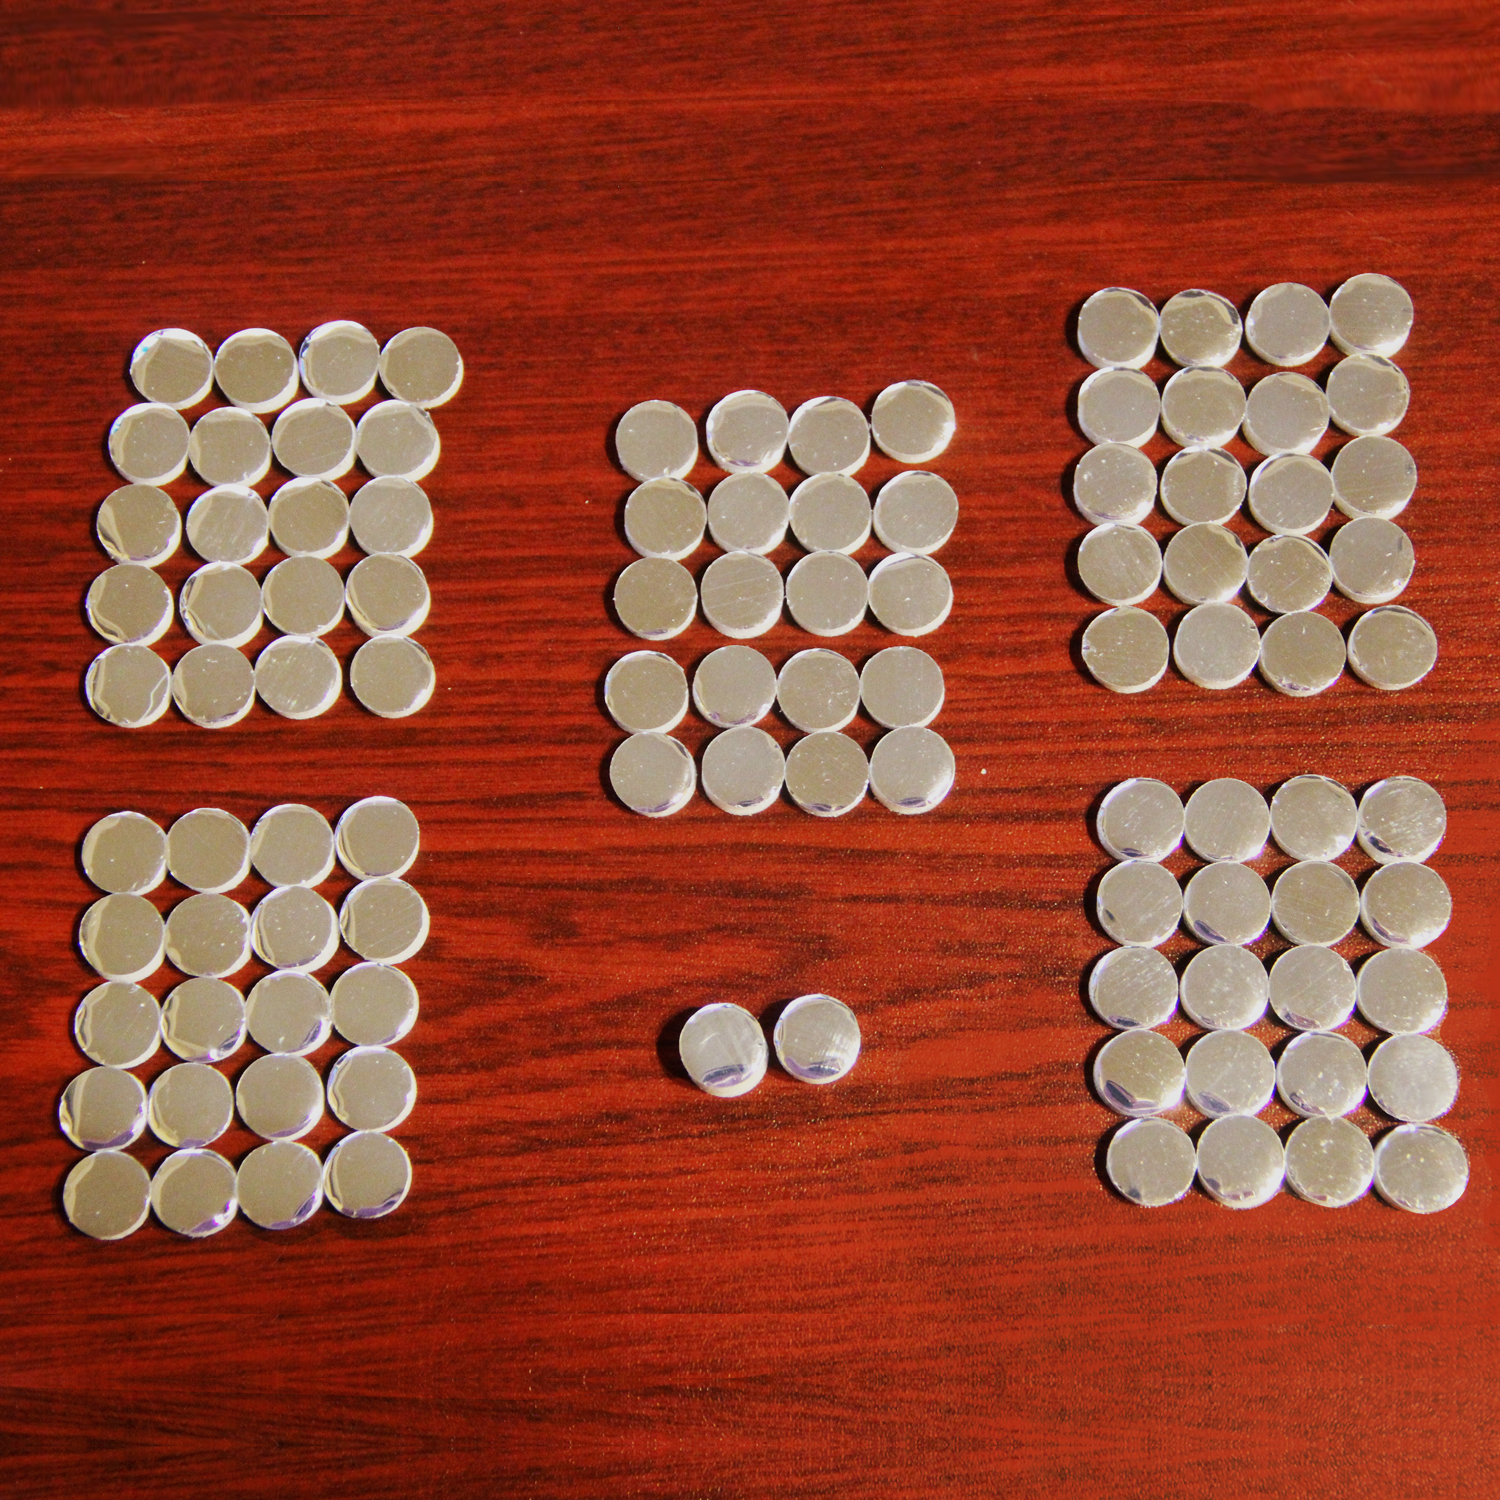
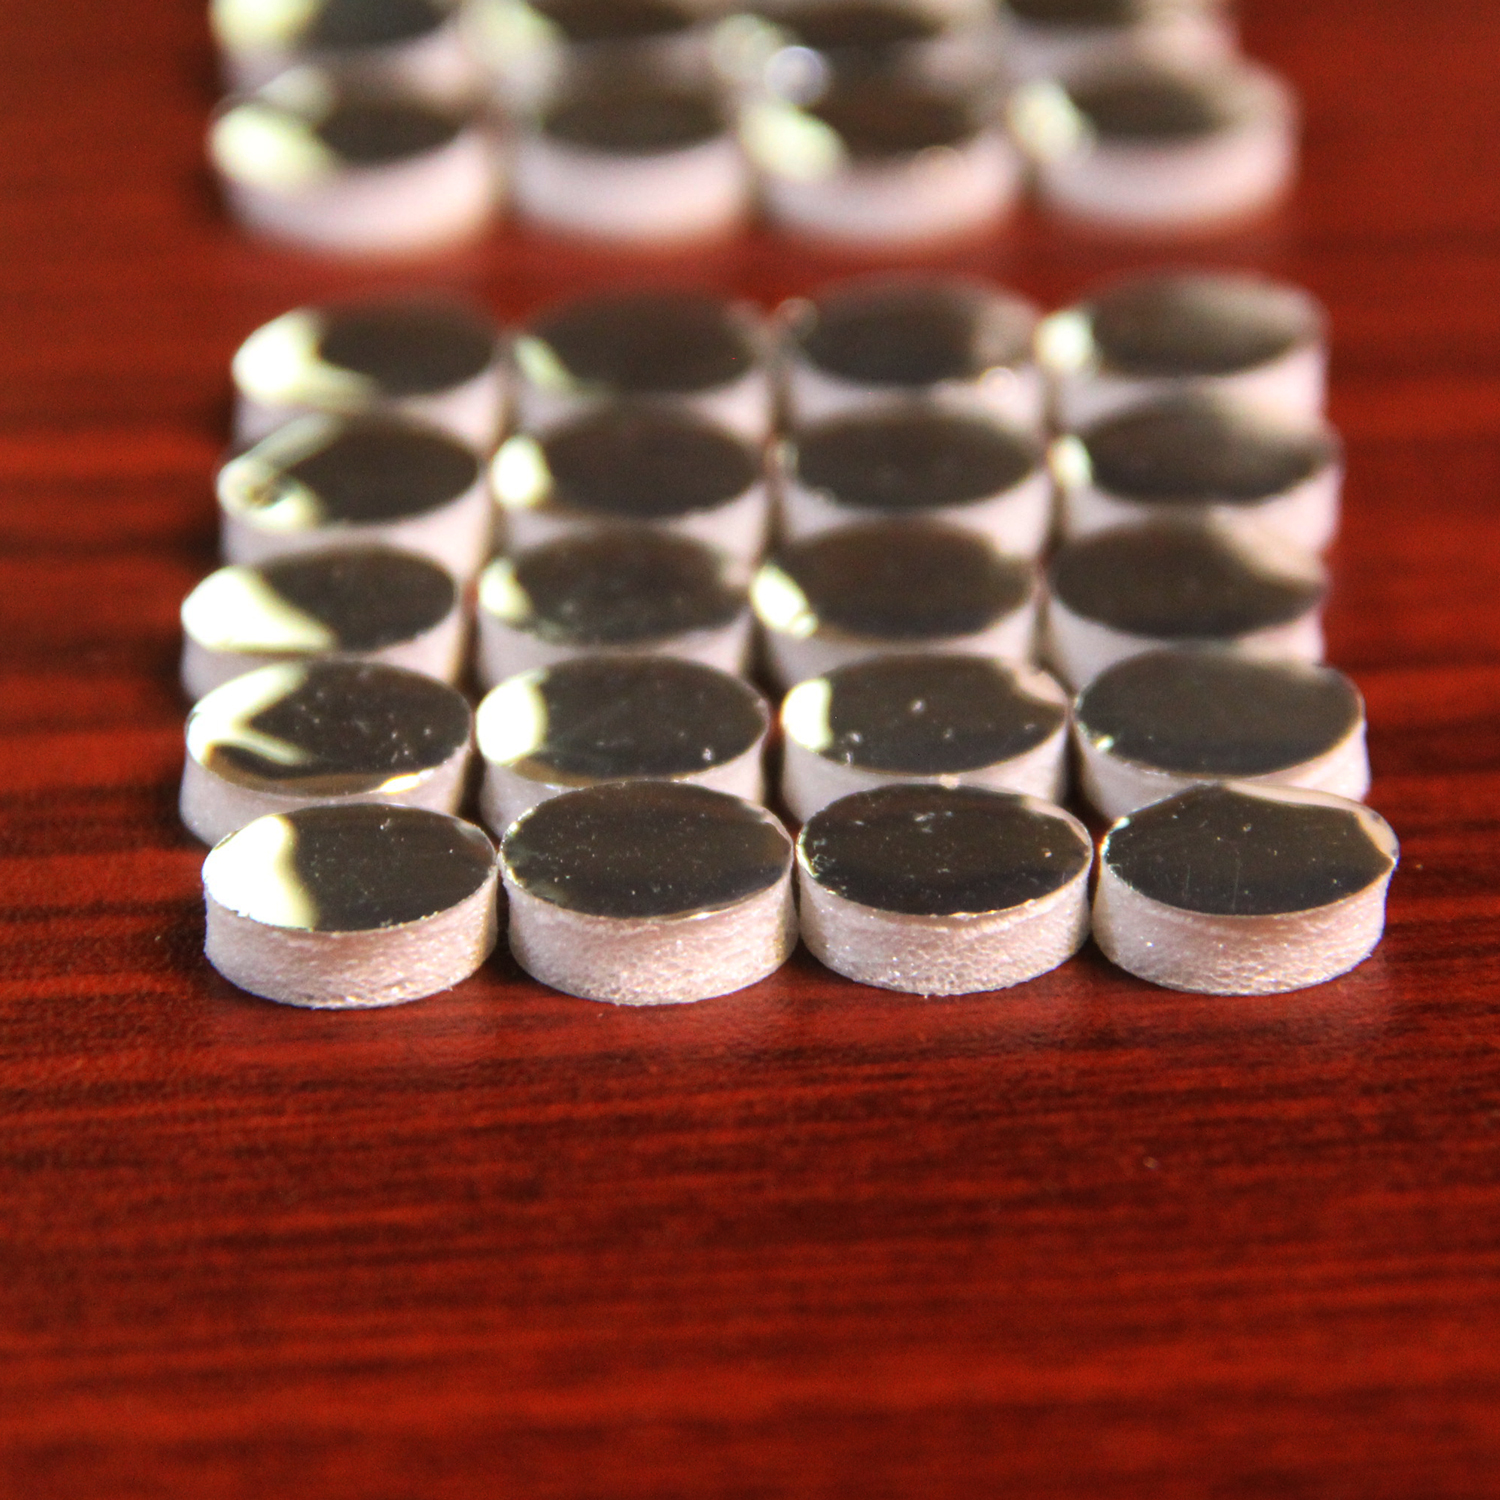
First I will start this post by simply linking the pads that I have available for sale now. If you have previously purchased pads from us in the past and have had difficulty with them, please keep reading. Here are the new aluminum plated Mylar foam pads we have for sale now in our store and on eBay:
We started selling these pads about a year ago, back then I was gluing large sheets plastic to foam and capacitive material and then hammering each pad out with a leather punch and hammer. While it is better than removing the original disintegrated foam pads from keyboards, cleaning the plastic and foil and then gluing pre-cut foam into those parts, it is still tedious and very loud work. After hammering out many, many bags my family began to protest.
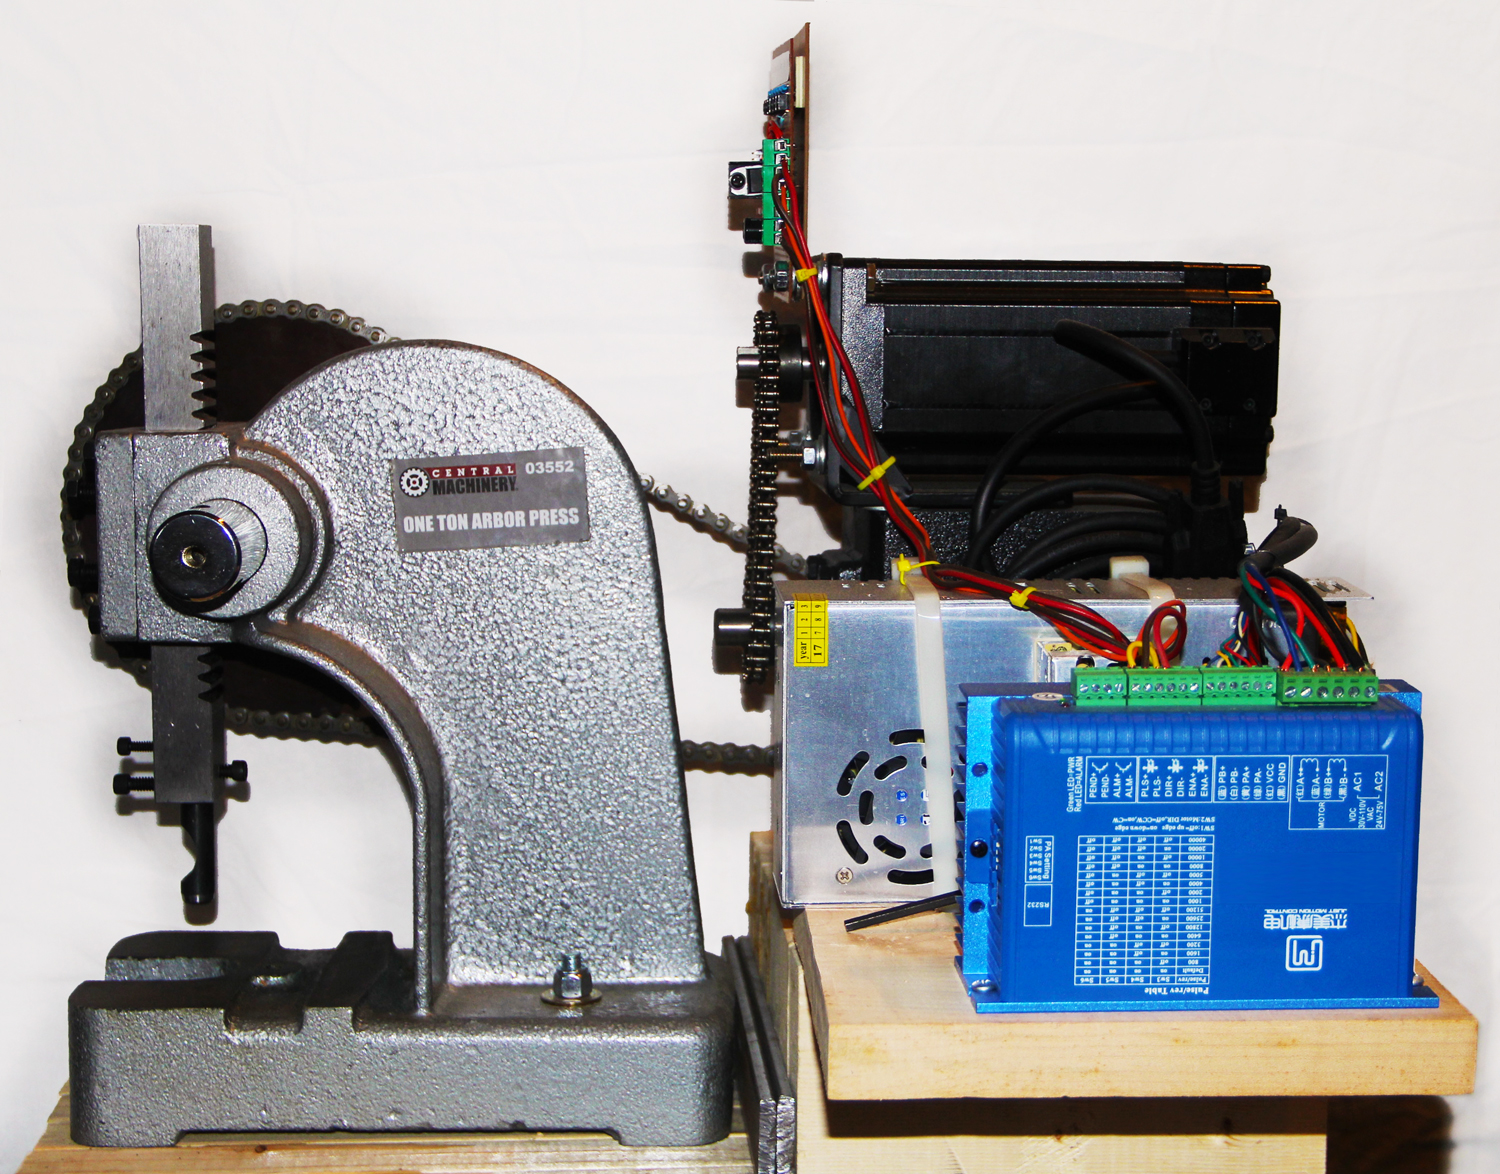
That’s when we decided to try using a modified arbor press. While there was much less noise involved, this method did not prove to be much better as the continual need for using force was just too labor intensive for me to provide a steady flow of inventory. That’s when my husband, Kevin, decided to try his hand at designing and building a machine that would make the process quicker and more consistent. It took quite a while to get the design completed and built.
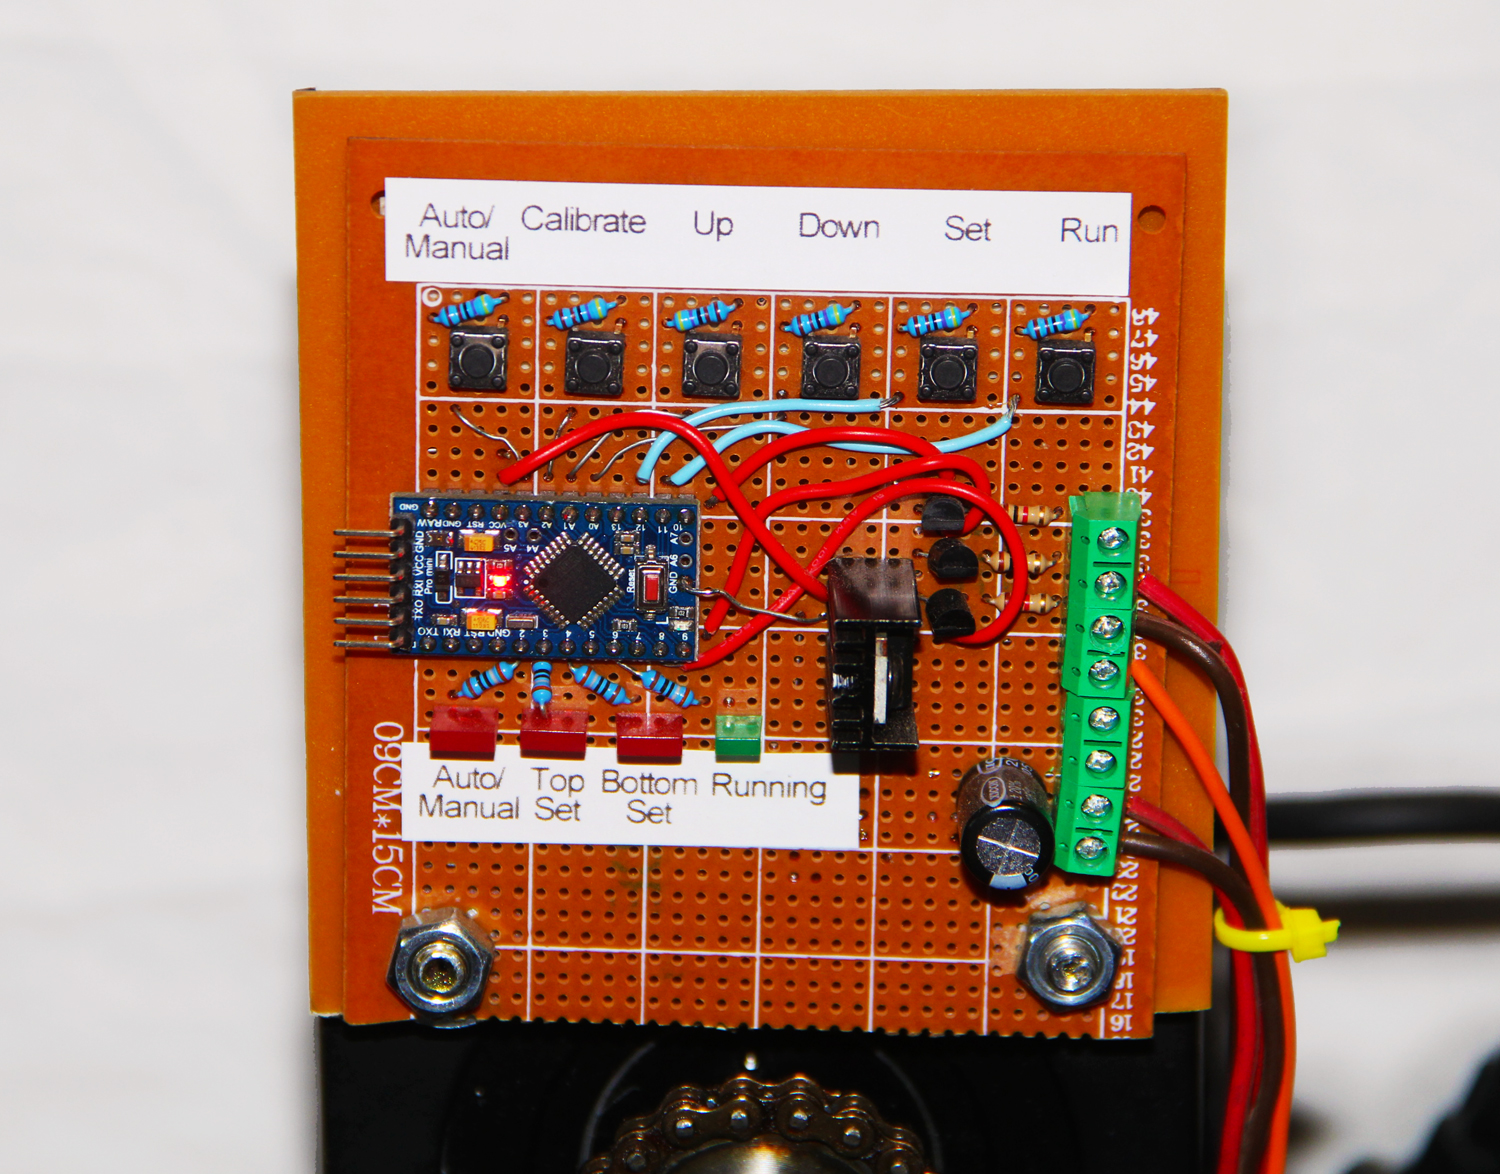
In that time we didn’t receive much feedback on the pads at all, good or bad. I had replaced the pads myself on several Compaq portables (luggables), Tandy machines and quite a few different terminals without much issue. Mostly just seating issues, or so I thought that was the issue at the time. The materials I was using never really came into my mind as a factor. If you have ever installed these pads, you know that getting the plastic seated under the clips can be a bit finicky and frustrating, but I thought I had it all down to a science. As I demonstrate in my video:
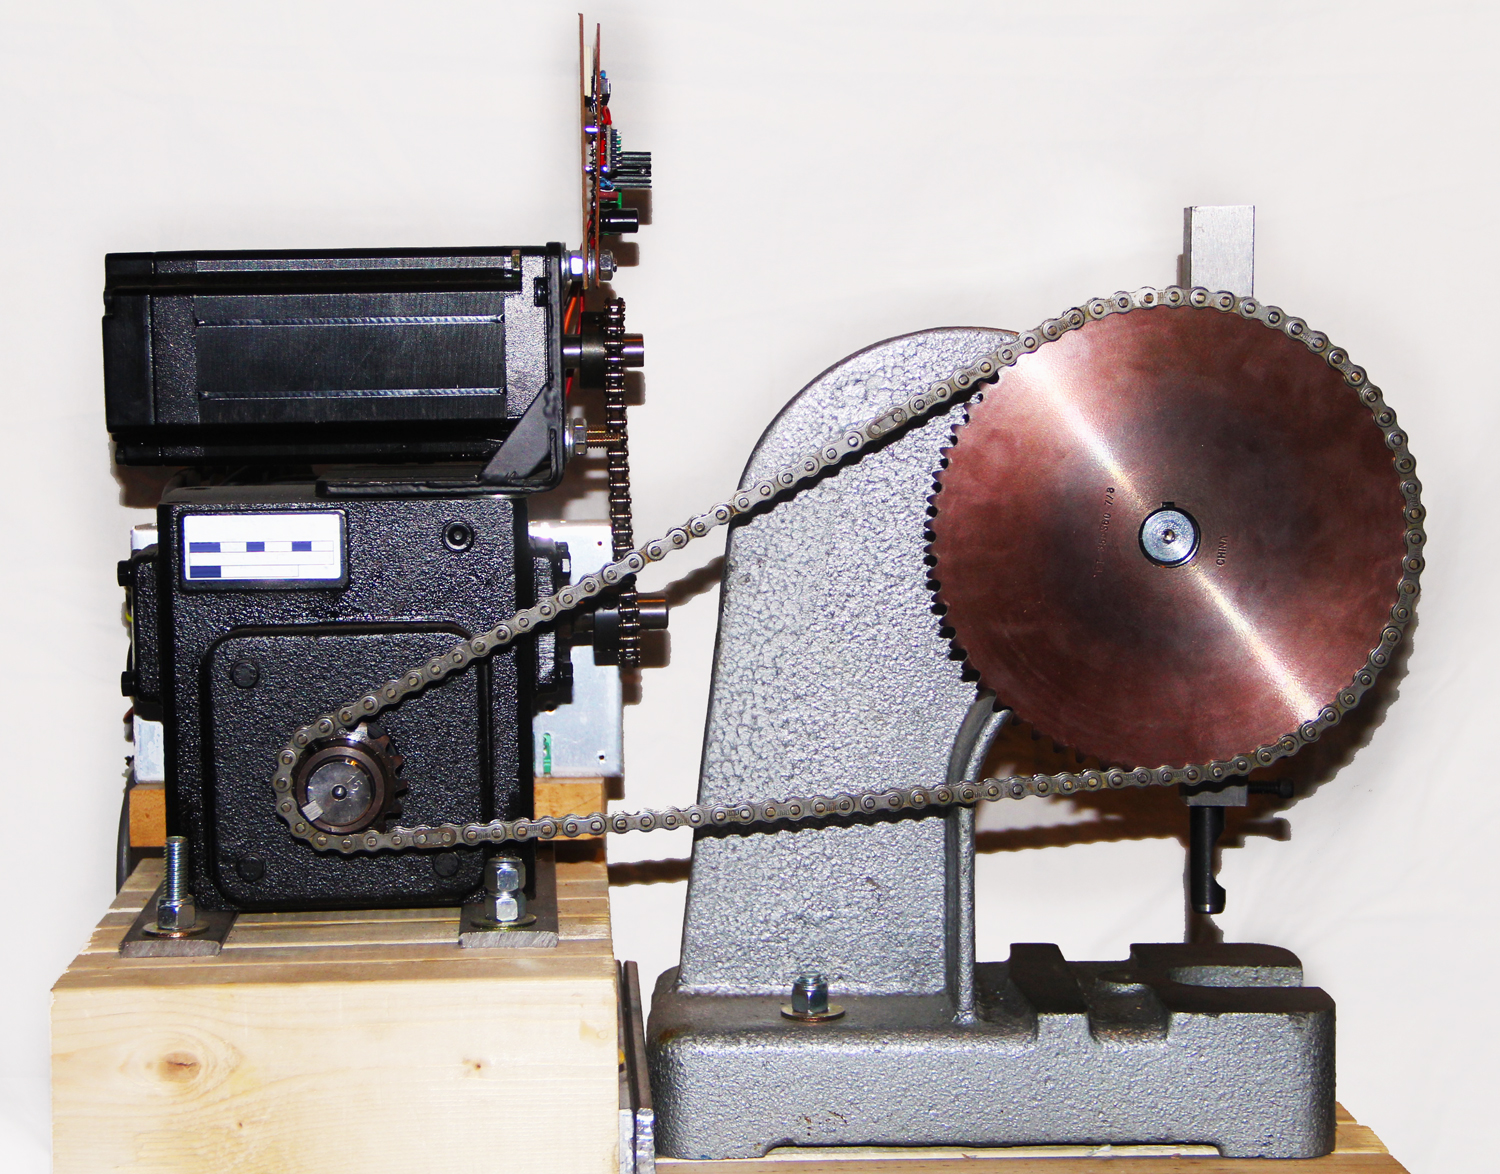
Fast forward many months later and the machine was finally up and running! After a few tests and trials we started making new pads with all the same material but the process was faster, much quieter and I was getting more consistent results as long as I didn’t try to punch too many layers stacked at a time. Here is the machine:
I have found that I get the best results by punching just one pad out at a time instead of trying to stack multiple layers of material to punch more than one at a time. This ensures that the plastics stay round and more consistent. Sometimes I get a bit too close to the edge or to an area where I have punched a previous pad so there is still some quality control at play. I provide 100 pads in each set to try and cover any pads I may miss as I check hundreds of pads in a row for consistency. Still, this process is much faster and more reliable than the constant banging of a hammer.
Also, the machine has to be calibrated each time I start a new round of punching and I did manage to fudge that a bit before I was fully acquainted with the machine. I unknowingly bent the punch that is on the machine and this made some of my pads a bit too slanted and I didn’t see it as I looked at each pad in quality control. I was mainly looking for roundness of the plastic and foil so it slipped by me.
We began selling these pads and about a month later I finally started receiving feedback. Some of it was about the slant but mostly we were getting complaints that some of the pads were not working at all, even after making sure they were seated properly. A couple of my customers suggested that the material was not the proper “foil” and there was just no capacitance happening. Some even managed to do an ohm test, which we had never even considered trying. The pads had worked for us on so many keyboards in the past so the thought never even crossed our minds.
One of my customers brought it to my attention that there was some talk about my pads on an Apple Lisa group on Facebook. So I joined the group and started talking with some very nice vintage computer connoisseurs there. They had some really great suggestions for me! I did some research and found a better material, aluminum plated Mylar, which I found I could purchase by the roll. It is a material that will not soon go away as it is used in many different applications. So I got to work ordering then cutting, gluing and punching! After a test or two of my own, along with tests by a couple of different customers, one of which being an Apple Lisa owner, the final product is ready and working better than our original material ever worked! Sometimes it’s hard to see the forest for the trees, especially when you are buried very deep within that forest. 😉 ** I have sent replacement bags out to customers who have contacted me. I have also been proactive answering questions via the Vintage Computer Federation forum and the Apple Lisa group. If you are one of these people who have ordered the old pads, please don’t hesitate to contact me! **
I also learned that some of the KeyTronics, like Apple Lisa keyboards, have a need for a deeper seated foam pad like the mechanical Caps Lock key. So I am now including a small bag of two double height pads with each bag of 100 “foam and foil” pads. These have already been tested and fit nicely.
I have received a couple of critiques on the density of the foam I am using. Our foam is more dense than open cell, which is what was originally used, and it will have a longer life overall so I am sticking with that for the time being. It will make the key presses feel a bit different but your keyboard will work great and for a much longer period of time! Maybe I will venture out from there later on for you purists out there, but for now, I do think this foam will have a longer shelf life than the original foam that KeyTronic used in the beginning.
Below is a short list I have compiled after speaking with customers and the nice people who have helped me get the material straightened out and tested. If you have a computer you have used these on that is not on this list, I’d love to see a comment on this post! I will add new machines to my is here and in our store(s) listings to help others find the pads for their own vintage machines:
Compaq Portable (also known as the Luggable)
Kaypro II
Apple Lisa 1
Apple Lisa 2
Sol 20 Terminal
Curvus Concept
Northstar Advantage
Victor 9000
Tandy TRS-80
Miniterm 1203
Another link for reference with more keyboards that should support these pads from Deskthority. Included in that link are the following machines: